I’m excited to share with you the world of cake pops, a delightful dessert that combines the joy of baking with the creativity of decorating. These bite-sized treats are perfect for any occasion, from birthday parties to weddings, and can be customized to fit any theme or color scheme using various cake recipes and dessert ideas.
As a fan of baking, I’ve always been fascinated by the endless possibilities of cake pops. With a little practice, you can create stunning cake pops that are sure to impress your friends and family, and they make great party treats. Whether you’re looking for a unique dessert idea or just want to try something new, cake pops are a great option.
In this guide, we’ll take you through the process of making cake pops, from the basics of baking and crumbling the cake to the art of decorating and presenting your creations, covering essential cake recipes and dessert ideas along the way.
Key Takeaways
- Cake pops are a fun and creative dessert idea
- They can be customized to fit any theme or color scheme
- Cake pops are perfect for parties and special occasions
- Baking and decorating cake pops can be a fun and rewarding hobby
- Cake recipes and dessert ideas can be used to create unique cake pops
My Journey with Cake Pops
I still remember the first time I made cake pops – it was a fun and creative experience that sparked a passion in me. As I experimented with different cake recipes and decorating techniques, I fell in love with the process of making these party treats. From mixing and baking the cake to dipping and decorating the pops, every step was a joy. I found that using cake pop sticks made it easy to handle the pops, and adding a chocolate coating gave them a delicious and professional finish.
As I continued to make cake pops, I realized that they are perfect for any occasion. Whether it’s a birthday, wedding, or holiday, cake pops can be customized to fit any theme. I’ve made cake pops for various events, and they’re always a hit. Here are some reasons why I think cake pops are great party treats:
- They’re easy to eat and can be made in a variety of flavors
- They can be customized with different decorations and coatings, such as chocolate coating
- They’re perfect for parties and events, and can be made in large quantities
I’ve also found that using cake pop sticks makes it easy to display and serve the cake pops. And, with a little creativity, you can make cake pops that are almost too cute to eat. Almost. With their delicious taste and adorable appearance, it’s no wonder that cake pops have become a popular party treat.
Essential Tools and Ingredients for Cake Pops
To get started with making cake pops, it’s crucial to have the right baking supplies on hand. This includes basic items like cake pans, mixers, and utensils. Additionally, you’ll need specific tools for cake pops, such as cake pop sticks and dipping tools. When it comes to ingredients, cake mixes are a great place to start, as they provide a convenient and consistent base for your cake pops.
In terms of decorations, having a variety of edible decorations available can help you customize your cake pops to fit any theme or occasion. Some popular options include sprinkles, candies, and colored sugars. You can also use edible decorations like icing and chocolate to add details and designs to your cake pops.
Here are some essential tools and ingredients to get you started:
- Cake pans and mixers
- Cake pop sticks and dipping tools
- Cake mixes and frosting
- Edible decorations like sprinkles and candies
- Chocolate or candy melts for coating
With these tools and ingredients, you’ll be well on your way to creating delicious and visually appealing cake pops. Remember to always use high-quality baking supplies and edible decorations to ensure the best results.

Classic Cake Pops Recipe
Ingredients
- Cake Base:
- 1 box of cake mix (flavor of choice) + ingredients required on the box (typically eggs, oil, and water)
- Binding:
- 1/2 cup frosting (store-bought or homemade)
- Coating:
- 2 cups candy melts or chocolate chips
- 1 teaspoon vegetable oil (optional, for thinning coating)
- Decoration:
- Sprinkles, edible glitter, or colored sugar (optional)
Tools
- Cake pop sticks
- Piping bag or ziplock bag (optional for drizzle designs)
- Baking tray
- Parchment paper
- Styrofoam block or cake pop stand
Recipe Steps
- Prepare the Cake Base:
- Bake the cake according to the package instructions. Let it cool completely.
- Crumble the cake into fine crumbs in a large mixing bowl.
- Mix and Form Cake Balls:
- Add frosting to the crumbled cake and mix until the texture resembles dough.
- Scoop out portions (about 1 tablespoon each) and roll into smooth balls.
- Place the balls on a parchment-lined baking tray and chill in the refrigerator for at least 2 hours or freeze for 15-20 minutes.
- Insert Sticks:
- Melt a small amount of candy melts or chocolate. Dip the end of each stick into the melted coating and insert it halfway into a chilled cake ball.
- Return the cake pops to the tray and let the coating set (5-10 minutes).
- Coat the Cake Pops:
- Melt the candy melts or chocolate in a microwave-safe bowl in 20-second intervals, stirring until smooth. Add a teaspoon of vegetable oil if needed for a thinner consistency.
- Dip each cake pop into the melted coating, ensuring it’s fully covered. Gently tap off excess coating.
- Decorate immediately with sprinkles or edible decorations before the coating hardens.
- Set and Serve:
- Insert the coated cake pops into a Styrofoam block or cake pop stand to set. Allow the coating to harden completely before serving.
Flavor Profile
These cake pops offer a sweet and moist interior with a creamy frosting bind, encased in a crisp candy or chocolate shell. Each bite balances texture and flavor, customizable to suit any theme or preference.
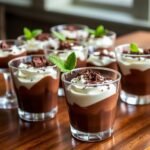
Serving Suggestions
- Serve at birthday parties, weddings, or festive gatherings.
- Wrap individually with clear cellophane and a ribbon for party favors.
- Display on a tiered stand or arranged in a decorative container filled with colored sugar or beans.
Pro Tip
For extra flair, use contrasting candy melts or chocolate in a piping bag to drizzle decorative lines across the coated cake pops. For a smoother coating, ensure the cake balls are well-chilled before dipping. Store in an airtight container at room temperature for up to 3 days or refrigerate for up to a week.
The Basic Cake Pop Technique
To create beautiful and delicious cake pops, it’s essential to master the basic technique. This involves several key steps, including baking and crumbling the cake, forming perfect balls, and dipping and coating them in chocolate or candy melts. By following these steps and using the right cake recipes and baking techniques, you can create stunning cake pops that are perfect for any occasion.
Baking and Crumbling the Base
The first step in making cake pops is to bake a cake and crumble it into a fine texture. This can be done using a variety of cake recipes, such as vanilla or chocolate. Once the cake is baked and cooled, it’s crumbled into a large bowl and mixed with frosting to create a dough-like consistency.
Forming Perfect Balls
Next, the cake mixture is formed into perfect balls, which can be done by hand or using a small cookie scoop. It’s essential to make sure the balls are evenly sized so that they bake and coat evenly.
Some tips for forming perfect balls include:
- Using the right amount of frosting to bind the cake mixture together
- Making sure the cake mixture is not too dry or too wet
- Using a gentle touch when forming the balls to avoid compacting the mixture too much

Dipping and Coating Tips
Finally, the cake balls are dipped and coated in chocolate or candy melts. This can be done using a variety of techniques, including dipping the entire ball in chocolate or using a drizzle effect to create a decorative coating. By using the right baking techniques and cake recipes, you can create stunning cake pops with a smooth and even chocolate coating.
| Technique | Description |
|---|---|
| Dipping | Dipping the entire cake ball in chocolate or candy melts |
| Drizzle | Using a drizzle effect to create a decorative coating |
Creative Cake Pop Decorating Ideas
When it comes to decorating cake pops, the possibilities are endless. With a little creativity, you can turn your cake pops into stunning works of art that match any theme or occasion. I love experimenting with different decorating ideas, from seasonal designs like snowflakes for winter or flowers for spring, to special occasion themes like weddings or birthdays.
One of my favorite things about decorating cake pops is using edible decorations. You can find a wide range of edible decorations, from sprinkles and nonpareils to edible glitter and dust. These decorations can add a pop of color and fun to your cake pops, making them perfect for party themes. Some other decorating ideas include using candy melts, chocolate chips, or even fresh fruit to create unique and delicious designs.
- Use a variety of colors and textures to add depth and interest to your designs
- Experiment with different shapes and sizes to create unique and eye-catching cake pops
- Don’t be afraid to try new things and make mistakes – they can often lead to new and exciting decorating ideas
Whether you’re making cake pops for a special occasion or just for fun, the most important thing is to have fun and be creative. With a little practice and patience, you can create beautiful and delicious cake pops that are perfect for any party themes. So don’t be afraid to get creative and try out some new decorating ideas – you never know what amazing designs you might come up with!
Troubleshooting Common Cake Pop Problems
When making cake pops, I often encounter baking problems that can be frustrating. To overcome these issues, I’ve learned a few cake pop tips that can help. For instance, if the cake is too crumbly, it can be difficult to shape into perfect balls. To solve this, I add a small amount of frosting to the cake mixture to bind it together.
Another common issue is decorating issues, such as uneven coating or mishaps with the candy melts. To avoid this, I make sure to melt the candy melts at the right temperature and use a dipping tool to coat the cake pops evenly. I’ve also found that using a turntable to spin the cake pops while the candy melts are still wet helps to create a smooth and even finish.
Some other common problems include cake pops that are too dense or too light. To solve this, I adjust the amount of frosting or cake mixture to get the right consistency. I’ve also found that using a cake pop maker can help to create uniform cake pops that are the right size and shape.
By following these cake pop tips and troubleshooting common baking problems and decorating issues, I’m able to create beautiful and delicious cake pops that are perfect for any occasion. Whether you’re a beginner or an experienced cake pop maker, I hope these tips are helpful in overcoming common problems and creating stunning cake pops.
- Adjust the amount of frosting to bind the cake mixture together
- Use a dipping tool to coat the cake pops evenly
- Spin the cake pops while the candy melts are still wet to create a smooth finish
With a little practice and patience, anyone can create beautiful and delicious cake pops that are perfect for any occasion.
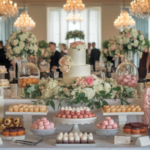
Storage and Display Tips for Professional-Looking Cake Pops
To keep your cake pops fresh and visually appealing, it’s essential to consider proper cake storage methods. This includes using airtight containers to maintain humidity and prevent contamination. When storing, make sure to place the cake pops in a single layer, avoiding any overlap or contact with each other.
For events, creative display ideas can make a significant difference in showcasing your cake pops. Consider using decorative stands, pedestals, or even a multi-tiered server to add a touch of elegance. You can also get creative with the presentation by using themed backdrops, colorful liners, or matching decorations to complement the occasion.
When it comes to shipping tips, careful packaging is crucial to prevent damage during transit. Use sturdy boxes, bubble wrap, or foam inserts to protect the cake pops, and consider using cold packs or insulated bags to maintain a consistent temperature. By following these guidelines, you can ensure your cake pops arrive at their destination looking professional and tasting fresh.
- Use airtight containers for storage
- Get creative with display ideas for events
- Follow careful packaging guidelines for shipping
By implementing these storage, display, and shipping strategies, you’ll be able to showcase your cake pops with confidence, knowing they’ll remain fresh and visually appealing for any occasion.
Conclusion: Creating Your Own Cake Pop Adventure
As we conclude this guide to Cake Pops, I hope you’re feeling inspired to embark on your own creative journey. Baking Cake Pops is not just about following a recipe; it’s an opportunity to unleash your inner artist and add your unique flair to these delightful treats. Whether you’re a seasoned baker or just starting out, the world of Cake Pops is full of endless baking community possibilities.
I encourage you to continue exploring, experimenting, and finding ways to put your personal stamp on every Cake Pop you create. Drawing cake pop inspiration from seasonal trends, special occasions, or your own imagination can lead to truly unique and captivating dessert ideas. The joy of Cake Pops lies in the process of crafting something special and sharing it with others.
As you embark on your Cake Pop adventure, remember to have fun, embrace your creativity, and never stop learning. The baking community is full of passionate Cake Pop enthusiasts who are more than happy to share their tips and inspire you along the way. So, what are you waiting for? It’s time to start your own Cake Pop journey!